The world’s most popular CKEditor has been integrated into TYPO3 and it was one of the great decisions. Here, I want to guide you from basic to advanced level CKEditor integration and customization into TYPO3 CMS.
CKEditor helps TYPO3 programmers and editors compared to old so-called htmlArea RTE editors. Since a TYPO3 v8, CKEditor is part of the TYPO3 core by replacing old RTE.
Let's get started with a step-by-step guide on TYPO3 CKEditor! Learn about setup, configurations,,`, customization, installing TYPO3 plugins, and much more. This guide covers rich text editor features, CKEditor 5, and HTML text editor options.
What is CKEditor?
CKEditor is an enterprise-grade WYSIWYG HTML text editor with wide browser compatibility, including support for legacy browsers. As a powerful rich text editor, CKEditor 5 offers robust features and functionalities for seamless content creation and editing.
What can you do with CKEditor?
- Copy/paste from Word and Excel, spell check, accessibility checker, and tables.
- Wide range of third-party plugins eg., autocomplete, widgets, code snippets, and Plugins.
- Better control over content: HTML filters and mode of view source code
- Excellent accessibility: WCAG 2.0 AA and Section 508 compliant.
- Long-term support (LTS) versions
- Leverage CKEditor 5 for advanced HTML text editing
Read more at the official website CKEditor.com
What does CKEditor do in TYPO3 CMS?
CKEditor is a third-party feature that is ready-to-go in TYPO3 via the system extension called EXT:rte_ckeditor. TYPO3 people now have cool-editors to easily manage their content.
21.000+ tests
The automated, manual, unit, and integration tests for CKEditor 4 and CKEditor 5.
27M+ downloads
The number of CKEditor downloads. The number of users exceeds hundreds of millions
400+ plugins
The community created over 400 publicly available plugins for CKEditor 4 thanks to such an approach.
23.000+ questions
The number of StackOverflow questions related to CKEditor.
Are you new to CKEditor?
No problem, Try by your self this quick demo now CKEditor.com/CKEditor-4/demo/
What are the features of CKEditor into TYPO3?
The extension rte_ckeditor incorporates the features of CKEditor and adds additional functionality, configuration presets, and plugins.
Sample Key Features
- Configurable via YAML files
- Default three ready-to-use CKEditor preset in TYPO3
- Flexible to modify of TYPO3 CKEditor Toolbar
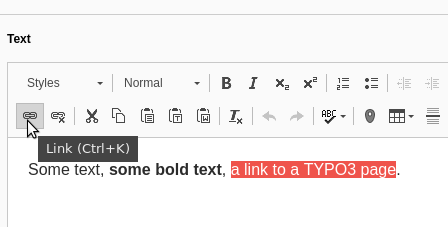
- Integrated with TYPO3 link wizard
- Integrated most popular word count CKEditor plugin into TYPO3
Why Did TYPO3 Switch from an HTML Text Editor to a CKEditor?
- Don’t have to fully maintain it by the TYPO3 community, Because other cool OpenSource projects are already well developed and maintained eg., CKEditor.
- CKEditor has good cross-browser & cross-compatibility support
- complying with the latest web accessibility standards.
- Cool in-line editing features that help to make better Frontend inline editing
- CKEditor includes a wide range of features such as formatting tools, spell check, and media embedding, which are not available in a basic HTML text editor.
But! wait... You don’t want to switch?
The old htmlArea RTE has been deprecated since TYPO3 v8.
If you have an old TYPO3 website with RTE htmlArea and it’s hard to migrate to CKEditor, then no problem, you can find updates and further maintenance at FriendsOfTYPO3/rtehtmlarea
CKEditor for TYPO3 Editors
TYPO3 RTE Editing Modes
CKEditor for TYPO3 editors makes content management easy and efficient. Enjoy advanced editing features and a user-friendly interface integrated seamlessly into TYPO3.
Mode 1: Classic Article Mode
The default RTE integrated into TYPO3 backend eg., Add text element get RTE.
Mode 2: Document Editor mode
Editing is similar to using Microsoft Word or Google Docs, where the document looks like a sheet of paper. The focus is on organizing content rather than the layout itself.
Mode 3: Inline Editor mode
Unfortunately, TYPO3 does not include fantastic front-end editing projects within its core. However, you can easily access and use these powerful tools from the TYPO3 Extension Repository (TER) or can get Support for TER to enhance your content management experience.
Basic features of CKEditor in TYPO3
What Are the Major Braking Changes in TYPO3 v12 and Beyond with CKEditor?
TYPO3 v12 introduced CKEditor 5, a completely new and rewritten editor compared to the previous CKEditor 4, which had been integrated into TYPO3 since TYPO3v8. If you have an older version of TYPO3, you need to upgrade the TYPO3 8 to 9 or higher version to utilize the benefits of CKEditor RTE.
CKEditor 5 Integration
TYPO3 v12 introduces CKEditor 5 as the default rich text editor, replacing CKEditor 4. CKEditor 5 comes with a completely new architecture and many modern features.
New Plugin System
CKEditor 5 has a new plugin system that is not compatible with CKEditor 4 plugins. This means that any custom plugins or configurations need to be rewritten to work with CKEditor 5.
CKEditor 5 Configuration Changes
This includes changes in toolbar configuration, plugin management, and other settings. Developers need to update their configurations to match the new structure.
Customizations and Extensibility
While CKEditor 5 offers advanced customization and extensibility options, the approach is different. Developers must familiarize themselves with the new ways to extend and customize the editor.
Security Enhancements
CKEditor 5 includes enhanced security features to protect against common vulnerabilities associated with rich text editors.
Looking for RTE Help? T3AI TYPO3 AI Co-Pilot is Here!
T3AI Co-Pilot, part of the powerful T3AI TYPO3 AI Extension, is your go-to assistant for simplifying content management within TYPO3 CMS. Designed with specialized features, T3AI Co-Pilot enhances your content creation, translation, and optimization processes directly within the TYPO3 Rich Text Editor (RTE). From drafting new content to translating it accurately and fine-tuning it for SEO, T3AI Co-Pilot helps streamline every step, making your TYPO3 experience more efficient.
What is YAML?
Since CKEditor uses YAML for configuration, it's important to first understand the basics of YAML files.
YAML (a recursive acronym for "YAML Ain't Markup Language") is a human-readable data serialization language. It is commonly used for configuration files and in applications where data is being stored or transmitted.
It’s very simple, Try Google with some examples to learn the concept and syntax.
Why TYPO3 Choose YAML?
“Did you know?
The RTE CKEditor has not been configured in PageTSConfig TypoScript anymore, Everything is managed through cool-YAML."
Instead of a bit complicated TypoScript, TYPO3 core team and community choose to have famous well-structured YAML configurations.
- CKEditor uses JavaScript for Integration
- TypoScript with TSConfig is bit hard new TYPO3 integrators and developers
- A new start for a new structure to separate processing and Editor-related configuration
- Allow options to be extended (but no condition or unsetting values)
What are the presets of CKEditor in TYPO3?
CKEditor has default presets to easily configure different variance, What’s preset?
- Define editor look and layout
- Define what tags and styles are allowed
- Define which plugins to load
- Define database processing RTE.proc
CKEDITOR.editorConfig = function(config) {
    config.toolbarGroups = [
        {name: 'basicSyles', groups: ['basicStyles']}
    ];
    config.removeButtons := 'Underline,Strike';
}YAML code of CKEditor for TYPO3
editor:
    config:
        toolbarGroups:
            - {name: basicSyles, groups: [basicStyles]}
        removeButtons:
            - Underline
- Strike- Step 3. Configure your preset, here are examples.
Default: CKEditor Preset
RTE {
    default.preset = default
}Full: CKEditor Preset
RTE {
    default.preset = full
}Minimal: CKEditor Preset
RTE {
    default.preset = minimal
}Override One Field
// Syntax: RTE.config.[tableName].[fieldName].preset
RTE {
    config {
        tt_content {
            bodytext.preset = myFavouritePreset
        }
    }
}Override One Field: If Type Match
// Syntax: RTE.config.tt_content.bodytext.types.textmedia.preset = minimal
RTE {
    config {
        tt_content {
            bodytext {
                types {
                    textmedia.preset = myFavouritePreset
                }
            }
        }
    }
}Override News Extension Field
RTE {
    config {
        tx_news_domain_model_news {
            bodytext.preset = minimal
        }
    }
}How does the default TYPO3 core CKEditor preset look-a-like?
You don’t require to start and learn each property by heart. A good way to learn from the TYPO3 core’s default configuration.
Just copy TYPO3 core’s YAML /typo3/sysext/rte_ckeditor/Configuration/RTE/Default.yaml to your custom extension /yourextension/Configuration/RTE/
# typo3/sysext/rte_ckeditor/Configuration/RTE/Default.yaml

# Load default processing options
imports:
    - { resource: "EXT:rte_ckeditor/Configuration/RTE/Processing.yaml" }
    - { resource: "EXT:rte_ckeditor/Configuration/RTE/Editor/Base.yaml" }
    - { resource: "EXT:rte_ckeditor/Configuration/RTE/Editor/Plugins.yaml" }

# Add configuration for the editor
# For complete documentation see http://docs.CKEditor.com/#!/api/CKEditor.config

editor:
  config:
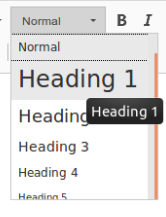
    format_tags: "p;h1;h2;h3;h4;h5;pre"
    toolbarGroups:
      - { name: styles, groups: [ styles, format ] }
      - { name: basicstyles, groups: [ basicstyles ] }
      - { name: paragraph, groups: [ list, indent, blocks, align ] }
      - { name: links, groups: [ links ] }
      - { name: clipboard, groups: [ clipboard, cleanup, undo ] }
      - { name: editing, groups: [ spellchecker ] }
      - { name: insert, groups: [ insert ] }
      - { name: tools, groups: [ table, specialchar ] }
      - { name: document, groups: [ mode ] }
justifyClasses:
      - text-left
      - text-center
      - text-right
      - text-justify
extraPlugins:
      - justify
removePlugins:
      - image
removeButtons:
      - Anchor
      - Underline
      - Strike
- Stylesif (empty($GLOBALS['TYPO3_CONF_VARS']['RTE']['Presets'][MyPreset])) {
$GLOBALS['TYPO3_CONF_VARS']['RTE']['Presets'][MyPreset] = 'EXT:yourextension/Configuration/RTE/MyPreset.yaml';
}Tip: You can also add the above code into typo3conf/AdditionalConfiguration.php
- Step 2. /yourextension/Configuration/RTE/MyPreset.yaml
# Import basic configuration
imports:
 - { resource: "EXT:rte_ckeditor/Configuration/RTE/Processing.yaml" }
 - { resource: "EXT:rte_ckeditor/Configuration/RTE/Editor/Base.yaml" }
 - { resource: "EXT:rte_ckeditor/Configuration/RTE/Editor/Plugins.yaml" }

# Add configuration for the editor
# For complete documentation see http://docs.CKEditor.com/#!/api/CKEditor.config
editor:
  config:
    # Include custom CSS
contentsCss: "EXT:yourextension/Resources/Public/Css/rte.css"- Step 3. Assign your Custom Preset to CKEditor RTE eg., RTE.default.preset = MyPreset at PageTS.
There are multiple options to perform Step 3 (assign custom preset to RTE) as below.
Option 1: Globally Applied with PageTSConfig
// Page > Properties > Resources > PageTS field
RTE {
    default {
        preset = MyPreset
    }
}Option 2: Setup through TCA
// yourextension/Configuration/TCA/tx_yourextension_domain_model_table.php

'content' => [
    'label' => 'YourLabel',
    'config' => [
        'type' => 'text',
        'cols' => 48,
        'rows' => 5,
        'enableRichtext' => true,
        'richtextConfiguration' => 'minimal',
    ],
],Option 3. Assign Preset to Particular Table/Field with PageTSConfig
// Page > Properties > Resources > PageTS field

// Syntax
RTE {
    config {
        [table].[field].preset = default
        [table].[field].types.[type].preset = full
    }
}

// Example
RTE {
    config {
        tt_content {
            bodytext {
                preset = minimal
                types {
                    textmedia.preset = default
                    myfield.preset = full
                }
            }
        }
    }
}# yourextension/Configuration/RTE/MyPreset.yaml
# Load default processing options
imports:
- { resource: "EXT:rte_ckeditor/Configuration/RTE/Processing.yaml" }
- { resource: "EXT:rte_ckeditor/Configuration/RTE/Editor/Base.yaml" }
- { resource: "EXT:rte_ckeditor/Configuration/RTE/Editor/Plugins.yaml" }
# Add configuration for the editor
# For complete documentation see http://docs.CKEditor.com/#!/api/CKEditor.config
editor:
config:
toolbarGroups:
- { name: clipboard, groups: [ clipboard, cleanup, undo ] }In the above example, the clipboard toolbar group contains three buttons. In this ways, you can configure your favorite editor :)
Explore awesome CKEditor’s UI based to get each button and toolbar at Toolbar Configurator
How can we allow images into CKEditor TYPO3?
Many people may be wondering how we can integrate images into CKEditor. In TYPO3 CMS login, by default such a feature is not available with CKEditor. However, you can enhance your HTML rich text editor experience by adding image integration to this WYSIWYG text editor. With the right configurations, your rich text editor JS setup can support seamless image embedding, making content creation much more dynamic and visually appealing.
- Same image handling as rtehtmlarea (magic images, usual RTE TSConfig supported)
- Image browser as usual in e.g. FAL file selector
- Dialog for changing width, height, alt and title (aspect ratio automatically maintained)
Step 1. Install TYPO3 extension EXT:rte_ckeditor_image
Step 2. Configuration
#1 EXT:yourextension/ext_localconf.php

$GLOBALS['TYPO3_CONF_VARS']['RTE']['Presets']['default'] = 'EXT:yourextension/Configuration/RTE/MyPreset.yaml';#2 EXT:yourextension/Configuration/RTE/MyPreset.yaml
imports:
# Import default RTE config (for example)
- { resource: "EXT:rte_ckeditor/Configuration/RTE/Default.yaml" }
# Import the image plugin configuration
- { resource: "EXT:rte_ckeditor_image/Configuration/RTE/Plugin.yaml" }# Your PageTSConfig
editor:
config:
# RTE default config removes image plugin - restore it:
removePlugins: nullStep 3. Enable RTE config preset
# Page TSConfig
RTE.default.preset = MyPresetStep 4. (Optional) Configuration
Maximum width/height
The maximum dimensions relate to the configuration for magic images which have to be set in Page TSConfig:
# Page TSConfig
RTE.default.buttons.image.options.magic {
    maxWidth = 1020  # Default: 300
    maxHeight = 800  # Default: 1000
}Usage as lightbox with fluid_styled_content
# Template Constants
styles.content.textmedia.linkWrap.lightboxEnabled = 1Allowed extensions
By default the extensions from $TYPO3_CONF_VARS['GFX']['imagefile_ext'] are allowed. However you can override this for CKEditor by adding the following to your YAML configuration:
editor:
  externalPlugins:
      typo3image:
allowedExtensions: "jpg,jpeg,png"# yourextension/Configuration/RTE/MyPreset.yaml
# Load default processing options
imports:
- { resource: "EXT:rte_ckeditor/Configuration/RTE/Processing.yaml" }
- { resource: "EXT:rte_ckeditor/Configuration/RTE/Editor/Base.yaml" }
- { resource: "EXT:rte_ckeditor/Configuration/RTE/Editor/Plugins.yaml" }
# Add configuration for the editor
# For complete documentation see http://docs.CKEditor.com/#!/api/CKEditor.config
editor:
config:
allowedContent: trueWhat is an Advanced Content Filter?
- Only tags/classes/styles that are configured should be kept
- Filter content during editing and paste
- Enabled by default
- Makes 'processing' config most of the times obsolete 'RTE.proc'
editor:
  config:
format_tags: "p;h1;h2;h3;h4;h5;pre;address;div"3. The Toolbar Groups
editor:
   config:
 	toolbarGroups:
     	- { name: clipboard, groups: [clipboard, undo] }
     	- "/"
- { name: styles }4 stylesSet
editor:
  config:
     stylesSet:
  	- { name: "quote-style", element: "p", attributes: { class: "quote-style"}}
  	- { name: "Load More Button", element: "a", attributes: { class: "load-more"}}
- { name: "More Content", element: "div", attributes: { class: "more-content"}}5. extraPlugins
editor:
  config:
    allowTags:
      - address
- labelallowTagsOutside:
- address
- labeljustifyClasses:
- text-left
- text-center
- text-right
- text-justify
- quote-styleextraPlugins:
- justify
removePlugins:
- imageremoveButtons:
- Anchor
- Underline
- Strike6 contentsCss
The ContentsCSS feature allows you to define various CSS styles for direct usage and viewing in CKEditor.
7. removeButtons
RemoveButtons helps in the removal of individual functions and buttons that result due to the importing of Base.yaml.
buttons:
  link:
    url:
      properties:
        class:
          default: 'external-link'
    properties:
      class:
allowedClasses: 'external-link'classes:
external-link:
name: 'External Link'classesAnchor:
externalLink:
class: 'external-link'
type: 'url'
target: '_blank''use strict';
(function ()) {
CKEDITOR.plugins.add('example_plugin', {
init: function (editor) {
// Let's add CKEditor Icon
// Note: Please put icon file at /Resources/Public/CkEditorPlugins/icons/mycustom.png
icons: 'mycustom',
// Add button to CKEditor
editor.ui.addButton('MyPreset',{
label: 'My Button',
toolbar: 'basicStyles',
command: 'insertTimestamp'
});
// Execute CKEditor Command
editor.addCommand('insertTimestamp',{
exec: function (editor){
var now = new Date();
editor.insertHtml (
'The current date and time is: <em>' + now.toString() + '</em>'
)
}
});
}
})
}Step 2. /yourextension/Configuration/RTE/MyPreset.yaml
# Load default processing options
imports:
- { resource: "EXT:rte_ckeditor/Configuration/RTE/Default.yaml" }editor:
# Let's load our sample custom plugin
externalPlugins:
myplugin: { resource: "EXT:yourextension/Resources/Public/CkEditorPlugins/myplugin.js" }Step 3. Register CKEditor Sample Custom Plugin
$GLOBALS['TYPO3_CONF_VARS']['RTE']['Presets']['MyPreset'] = 'EXT:yourextension/Configuration/RTE/MyPreset.yaml';Step 4. Test-drive with RTE
RTE {
    default {
        preset = MyPreset
    }
}# Create yourextension/Resources/Public/CkEditorPlugins/myplugin.js
'use strict';
(function ()) {
CKEDITOR.plugins.add('example_plugin', {
init: function (editor) {
// Let's add CKEditor Icon
// Note: Please put icon file at /Resources/Public/CkEditorPlugins/icons/mypreset.png
icons: 'mypreset',
// Add button to CKEditor
editor.ui.addButton('MyPreset',{
label: 'My Button',
toolbar: 'basicStyles',
command: 'openExampleModal'
});
// Execute CKEditor Command
editor.addCommand('openExampleModal',{
exec: openModal
});
}
})
}
function openModal() {
require([
'TYPO3/CMS/Backend/Modal'
], function(Modal) {
Modal.show(
'Sample Plugin',
'Hello'
);
})
}Advanced AJAX-based Custom TYPO3 CKEditor Plugin
# /yourextension/Configuration/RTE/MyPreset.yaml
# Let's configure AJAX route of TYPO3
editor:
    # Let's load our sample custom plugin
    externalPlugins:
        myplugin: {
            resource: "EXT:yourextension/Resources/Public/CkEditorPlugins/myplugin.js"
            route: "configsample_route"
        }

# yourextension/Resources/Public/CkEditorPlugins/myplugin.js

function openModal() {
    // Get AJAX URL
    var url = editor.config.myplugin.routeUrl;

    require([
        'TYPO3/CMS/Backend/Modal'
    ], function(Modal) {
        // Display modalbox
        Modal.cdvanced({
            type: Modal.types.iframe,
            title: 'Sample Plugin',
            content: url,
            size: Modal.sizes.large
        })
    })
}
# Create yourextension/Resources/Public/CkEditorPlugins/myplugin.js
'use strict';
(function () {
CKEDITOR.dtd.$removeEmpty.em = 0;
CKEDITOR.dtd.$removeEmpty.i = 0;
CKEDITOR.plugins.add('icon-envelope', {
icons: 'iconenvelope',
init: function (editor) {
editor.ui.addButton( 'IconEnvelope', {
label: 'Icon E-Mail',
toolbar: 'insert',
command: 'insertIconEnvelope'
});
editor.addCommand( 'insertIconEnvelope', {
exec: function (editor) {
var icon = editor.document.createElement('i');
icon.setAttribute('class', 'fa fa-envelope');
editor.insertElement(icon);
}
});
}
});
});Step 2. Include in YAML Configuration
#  /yourextension/Configuration/RTE/MyPreset.yaml

# Load default processing options
imports:
    - { resource: "EXT:rte_ckeditor/Configuration/RTE/Processing.yaml" }
    - { resource: "EXT:rte_ckeditor/Configuration/RTE/Editor/Base.yaml" }
    - { resource: "EXT:rte_ckeditor/Configuration/RTE/Editor/Plugins.yaml" }

# Add configuration for the editor
# For complete documentation see http://docs.ckeditor.com/#!/api/CKEDITOR.config
editor:
  externalPlugins:
icon-envelope: { resource: "EXT:mytheme/Resources/Public/CkEditorPlugins/icon-envelope/plugin.js" }- Step 1. Search CKEditor plugin which you want to integrate into TYPO3 from CkEditor Plugin
- Step 2. Let's imagine you want to integrate this Codesnippet plugin CKEditor Codesnippet
- Step 3. Download & Unzip the plugin Put the plugin at yourextension/Resources/Public/CKeditor/Plugins/codesnippet/
- Step 4. Configuration/RTE/Plugin.yaml
editor:
   externalPlugins:
       codesnippet:
resource: "EXT:yourextension/Resources/Public/CKeditor/Plugins/codesnippet/"Step 5. Any extra configuration require in the plugin, check their documentation
Step 6. Clear the cache! You should able to see "Insert Code Snippet"
Step 1.Download & Unzip plugin ckeditor.com/cke4/addon/youtube
Put the plugin at yourextension/Resources/Public/CKeditor/Plugins/youtube/
Step 2. Configuration/RTE/Plugin.yaml
editor:
  externalPlugins:
    youtube: { resource: "EXT:mx_ext/Resources/Public/RTE/Plugins/youtube/plugin.js" }
  config:
    youtube_width: '550'
extraAllowedContent: '*(*)[data-*]; iframe'Step 3. Clear the cache! You should able to see "Youtube Video Button"
Word Count TYPO3 CKEditor
Step 1. Download & Unzip plugin https://ckeditor.com/cke4/addon/wordcount
Put the plugin at yourextension/Resources/Public/CKeditor/Plugins/wordcount/
Step 2. Configuration/RTE/Plugin.yaml
# Register wordcount plugin for ckeditor
editor:
  externalPlugins:
    wordcount:
resource: "EXT:rte_ckeditor_wordcount/Resources/Public/JavaScript/Plugins/wordcount/"Step 3. Import into RTE Preset
imports:
  - resource: { "EXT:rte_ckeditor_myplugin/Configuration/RTE/Plugin.yaml" }

editor:
  config:
    wordcount:
showCharCount: trueStep 4. Clear the cache! You should be able to see the "WordCount” button.
editor:
  config:
    defaultContentLanguage: "de"
    defaultLanguage: "de"
    contentsLanguage: "de"
    language: "de"
    scayt_autoStartup: true # Spellcheck always on
    scayt_sLang: "de_DE" # spellcheck language
wsc_lang: "de_DE"Popular TYPO3 CKEditor Extensions
Font Awesome Icons into TYPO3 CKEditor
Step 1. Install TYPO3 Extension rte_ckeditor_fontawesome
Step 2. TS Config
# For the default template to the CKE-Editor
RTE.default.preset = defaultFA4

# For the full template of CKE-Editor
RTE.default.preset = fullFA4Step 3. TYPO3 Constants
# Include your font-awesome path
plugin.tx_ckeditor_fontawesome.css = {$path}

# Inlcude font-awesome through CDN
plugin.tx_ckeditor_fontawesome.css = https://maxcdn.bootstrapcdn.com/font-awesome/4.7.0/css/font-awesome.min.cssStep 4. Import to Your RTE Config
To add this Plug-In in your own RTE Config. Import the Config in your preset.
imports:
- { resource: "EXT:rte_ckeditor_fontawesome/Configuration/RTE/PluginFA5.yaml" }At the next step, you need to extend your individual Toolbar-Config to add the Clickable Icon.
editor:
  config:
    toolbar:
        - [ 'Bold', 'Italic', .....]
        ...
- [ 'ckeditor_fa5' ]Do you want to migrate RTE htmlArea to CKEditor in TYPO3?
Unfortunately, TYPO3 does not provide any automatic migration from old RTE htmlArea to CKEditor.
You should carefully migrate it manually, but no worries, It’s not that much hard. Because, most of them are looking very similar so go one by one each configuration.
RTE htmlArea PageTSConfig
RTE.default {
  showButtons(
    bold, italic, underline,
    left, center, right, justifyfull,
    orderedlist, unorderedlist, indent, outdent,
         line, link, removeformat,
    copy, cut, paste, undo, redo
  )
  toolbarOrder(
    bold, italic, underline, bar,
    left, center, right, justifyfull,
    orderedlist, unorderedlist, bar, indent, outdent, linebreak,
         line, link, removeformat, bar,
    copy, cut, paste, bar, undo, redo
  )
}RTE CKEditor YAML
editor:
  config:
    toolbar:
      - [ 'Bold', 'Italic', 'Underline', '-' ]
      - [ 'JustifyLeft', 'JustifyCenter', 'JustifyRight', 'JustifyBlock' ]
      - [ 'NumberdList', 'BulletedList', '-', 'Indent', 'Outdent' ]
      - '/'
      - [ 'HorizontalRule', 'Link', 'RemoveFormat', '-' ]
      - [ 'Copy', 'Cut', 'Paste', '-' , 'Undo', 'Redo']
    extraPlugins:
- justifyWrap-up!
Thanks for reading a long article.
I hope you enjoyed and explored more about cool CKEditor with our beloved awesome TYPO3 CMS.
What’s your favorite feature in CKEditor? Do you have any questions on CKEditor integration with TYPO3? Did we miss any important feature integration of CKEditor in TYPO3?
Please feel free to write any questions, feedback, or issues at the below comment box. We will be happy to write you back.
Have a Happy Editing!
Post a Comment
- Thank you for this blog it's very helpful to me.
- Indeed Sanjay. CKEditor has changed directions for TYPO3 editors. Very well written and informative blog. Thanks Regards Andreas
- Dear Andreas Gerber , thank you so much. I’m so glad you found it helpful









Sanjay Chauhan
CTO - T3Planet & NITSANSanjay Chauhan, Mitbegründer von NITSAN (Preisgekrönte TYPO3 Agentur) und Pionier von T3Planet, dem ersten TYPO3 Shop weltweit.
Ein wahrer TYPO3-Fanatiker seit 2010.
Mit meinem umfangreichen technischen Wissen und…
More From Author
Sanjay Chauhan
CTO at T3Planet & NITSANSanjay Chauhan, Co-Founder of NITSAN (Award winning TYPO3 agency) and Pioneer of T3Planet (first-ever TYPO3 Shop).
A true TYPO3 fanatic since 2010. I bring strong TYPO3 experience in building customer-business…
More From Author